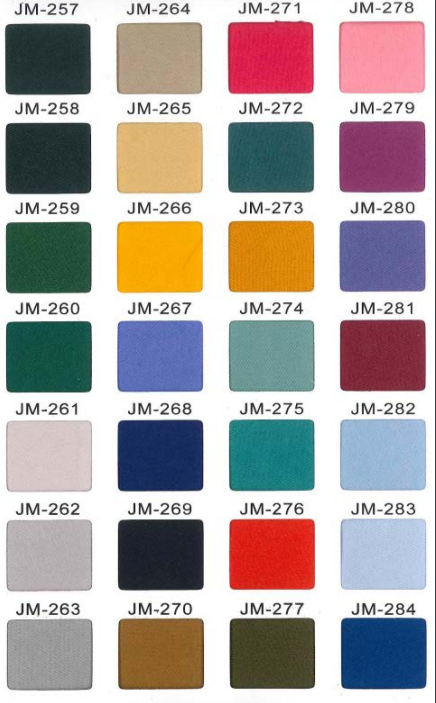
Are you tired of your club or event lacking a unique and cohesive identity? Look no further than custom patches! Whether it's for a sports team, social club, or music festival, custom patches are the perfect solution to add a personalized touch to your group. Not only do they display your logo or design in an eye-catching way, but they also create a sense of unity among members. In this blog post, we'll explore why custom patches are a must-have for any club or event and how they can benefit your organization. Get ready to elevate your group's style with these versatile accessories!
Custom patches are a popular way to add a personal touch to uniforms, bags, hats, and more. When it comes to creating patches with photo-quality designs, dye sublimation is the way to go. Dye sublimated patches are created using a process that involves transferring ink directly onto the fabric, resulting in vibrant, long-lasting colors and sharp, clear images. In this blog post, we will explore the benefits of dye sublimated patches and why they are the perfect choice for creating custom patches with detailed, photographic designs. If you're looking to create high-quality custom patches for your business or organization, keep reading to learn more about dye sublimation and its advantages.
Custom patch designs are increasingly becoming an essential aspect of fashion and branding today. They are versatile and can be customized to match the specific requirements of your retail business. If you are looking to level up your retail business, then custom patches can significantly help you achieve this. So, in this blog post, we’ll explore how you can transform your retail business using custom patch designs.
“So how does this work, anyway?” That's the main question we get from new customers that have never ordered a patch before. We are here to help make this process easy and efficient for you - no stress!
Have you ever heard of a 'combo' patch? This means that there are two different methods to the patch production. Today, we will learn a little more about a combo of dye sublimation and embroidery.
Custom patches are a way to express your connection or participation with a team, institution, employer, cause or event by wearing it on your person, or adding it to an accessory like a bag! They’re also a fantastic way to promote your company or brand in bulk at conferences, tradeshows and festivals.
Has your business come across budget constraints when considering embroidering individual caps and uniform items with direct embroidery? We are here to help with bulk patches!
If you’re new to using embroidered patches for your company logo, cycling club, or martial arts team, it might be a bit intimidating to attach a patch to your uniform or gear bag. It’s never a bad idea to ask for help, so today we’re going to cover into how to properly sew a patch on a backpack. This is part of an ongoing series to help new patch owners get the most out of their brand new Artex Group Patches!
Where To Start?
There are a few ways to attach a patch to your backpack. Likely you’ll either be sewing the patch on, use a heat press to attach the patch, or simply affixing the patch with an adhesive. The best place to start is to determine how you plan to affix your new patch. From there it will just be a small matter of having to gather your supplies. The requirements will likely be minimal and you’ll be able to enjoy your new patch in no time! Now let’s get down to the nitty-gritty and discuss how to attach your patch.
Sewing A Patch Onto A Backpack
If you’re sewing your new patch onto a bag you’ll likely just need a needle & thread. We recommend ordering your patch with a “sticky back” adhesive so you can properly place your patch and keep it in place while you are sewing it on. You can use whatever color thread you’d like, just make sure it’s strong enough to hold the patch in place. We’d recommend a size #69 nylon thread for an application like this. It’s also a good idea to use a little bit of waterproof sealant on the edges of the patch to prevent moisture from getting under the patch.
The process is simple enough, and you’ll need to do the following:
Decide where you want to add your patch. The sticky back adhesive will keep it in place.
Use a running stitch to sew the patch in place, which is the best stitch for patchs. If you’re new to sewing here’s a how-to video covering the running stitch.
Heat Press
A heat press patch (sometimes called an iron-on patch) will require a heat seal machine. While you could use a household iron, we don’t recommend doing so as it is difficult to achieve the necessary pressure. A heat press will allow you to attain a pressure between 50-70 pounds, while a household iron will not. Using an iron can lead to improper sealing for your heat patch due to inadequate pressure, which can cause your patch to not adhere properly.
The good news is that attaching your patch to a backpack isn’t different from adding it to any other garment. The method we recommend is as follows:
Set the heat seal machine to 330 to 365 degrees. Your temperature is dependent on the type of material you are adhering to.
Prior to placing the custom made patch on the bag, pre-heat the spot where the patch is to be placed for 15 seconds. Our sticky back adhesive (which will also act as a heat seal adhesive) will allow you to properly set the patch in place prior to heating.
Place the embroidered patch on the pre-heated spot and apply heat for 18 to 20 seconds using 50 to 70 pounds of pressure
Allow the item to cool for at least 5 hours for a permanent application
Adhesive
While our sticky back adhesive provides strong, temporary bonding, you may decide to use an adhesive for permanent fixture. There are plenty of fabric glues you can use and the process is simple enough. Simply apply the fabric glue to the inside of the patch, and follow the manufacturer’s instructions regarding how to attach the patch. Likely you’ll just need to allow the glue to dry for a few minutes, and then you can affix the patch onto your backpack.
Do you have any other questions regarding the use and care of your brand new patch? Feel free to reach out to the Artex Group and we’ll gladly answer any questions you may have!
https://www.artexgroup.net/wp-content/uploads/2021/10/FNM83h3pUXeolh9vCZsuWa9QSEF6kcO2O9X12GNHO0bKKLo90cbrD6z6M6IDZ8Wel1UcAWkLZ6T53bl4JYeSKeBzJPo7SMg7nPZlhfFpA6Y_e8LGMvHmdN2QmS8ZJtEfb3INI2M.jpeg300450Marketing Departmenthttps://www.artexgroup.net/wp-content/uploads/2021/11/Artex-blue-logo.jpgMarketing Department2020-08-25 20:41:032022-03-01 09:46:14New Patch Owners Guide: How To Sew A Patch On A Backpack or Bag